Latest Post

Password using PLC

Written By Mr Lam on Wednesday, May 16, 2012 | 3:26 PM


Simulation Password 
Password PLC


Detail for Password Using PLC


Password PLC
Information on Numbers for Detail the Password Using PLC : 
1. KeyPad with 10 Numeric and 1 Enter (Numeric KeyPad)
2. PLC (Programmable Logic Controller)
3. Red Light for Wrong Password
4. Green Light for Correct Password 


Wiring from the Numeric KeyPad to PLC


Numeric KeyPad
Information on Wiring from the Numeric KeyPad to PLC : 
1. Input 0 PLC for Numeric 0 from KeyPad
2. Input 1 PLC for Numeric 1 from KeyPad
3. Input 2 PLC for Numeric 2 from KeyPad
4. Input 3 PLC for Numeric 3 from KeyPad
5. Input 4 PLC for Numeric 4 from KeyPad
6. Input 5 PLC for Numeric 5 from KeyPad
7. Input 6 PLC for Numeric 6 from KeyPad
8. Input 7 PLC for Numeric 7 from KeyPad
9. Input 8 PLC for Numeric 8 from KeyPad
10. Input 9 PLC for Numeric 9 from KeyPad
11. Input 10 PLC for ENTER from KeyPad 

Number Of Inputs and Output PLC applied :
1. Number Of Inputs PLC is 11 Input :
--- 11 Unit Input from Numeric KeyPad 
--- Total Number Of Inputs PLC is Minimum 11 Input Unit. 

2. Number Of Output PLC is 2 Output :
--- 1 Unit Output to Red Light for Wrong Password 
--- 1 Unit Output to Green Light for Correct Password 
--- Total Number Of Outputs PLC is Minimum 2 Output Unit. 


Sequence PLC Programming for Password PLC : 

1. Correct Password
a. If typing "5500" from KeyPad AND "ENTER" from KeyPad then Green Light = ON (Correct Password) 

2. Wrong Password
a. If NOT typing "5500" from KeyPad AND "ENTER" from KeyPad then Red Light = ON (Wrong Password) 

3. Password Data
a. Password data using PLC memory (With Value 5500) and can be modified 

4. Green Light = OFF OR Red Light = OFF
a. If Enter Released AND Typing again then Green Light = OFF OR Red Light = OFF
(source : http://program-plc.blogspot.com)

Programming servo motor

1. Positioning Module QD75M1 parameters:
Positioning Module parameters
2. Servo Amplifier (MR-J2S-B) and Servo Motor (HC-KFS73) Parameter :
Servo Parameter
3. Start Operation
For Start Operation X20 = ON
Start Operation
4. Positioning Data
4.a. Positioning Data No.1
Positioning Data 1
4.b. Positioning Data No.2
Positioning Data 2
5. Positioning Start No.1 and No.2
For positioning Start X21 = ON
Positioning Start

(source : http://program-plc.blogspot.com)

Servo diagram

Here's an example Servo Wiring Diagram for Q-series PLC from Mitsubishi, Positioning module, servo amplifier and motor servo. 
Servo Wiring Diagram

Servo Wiring Diagram
PLC for application of servo motor

PLC for servo motor
Component is needed for the servo wiring diagram is: 
1. Q62P PLC Power Supply ( MELSEC-Q Mitsubishi ).
2. CPU unit Q02CPU ( MELSEC-Q Mitsubishi ).
3. Positioning Module QD75M1 ( MELSEC-Q Mitsubishi ).
4. Servo amplifier MR-J2S-B ( Mitsubishi ).
5. MR Buss Cable J2HBUS1M ( Mitsubishi ).
6. End Terminal MR-A-TM ( Mitsubishi ).
7. Limit Switch to Zero Position .
8. Encoder cable JCCBL05M MR-H ( Mitsubishi ).
9. MR-PWCNK2 connector ( Mitsubishi ).
10. Servo motor HC-KFS73 ( Mitsubishi ).

Application for Servo


Applications servo motor


Information for Applications servo motor: 
1. Push Button Switch with Light for Start Operation / Zero Position.
2. Push Button Switch with Light for Positioning Start.
4. Limit Switch to Zero Position.
3. Ball Screw with gear lead (µm/rev) = 10mm.
4. Servo Motor.
5. Servo Amplifier.
6. PLC MELSEC-Q.
7. Positioning Module QD75M1.


Number Of Inputs and Output PLC applied :
1. Number Of Inputs PLC is 2 Input :
--- 1 Unit Input for Push Button Switch for Start Operation. 
--- 1 Unit Input for Push Button Switch for Positioning Start. 
--- Total Number Of Inputs PLC is Minimum 2 Input Unit.


2. Number Of Output PLC is 2 Output :
--- 1 Unit Output for Light Push Button Switch in Start Operation / Zero Position. 
--- 1 Unit Output for Light Push Button Switch in Positioning Start. 
--- Total Number Of Outputs PLC is Minimum 2 Output Unit.


Sequence for Application of Servo Motor with PLC MELSEC-Q ( Mitsubishi ): 

Step 1 : Start Operation / Zero Position 
a. If Push Button Start OPR = ON Then JOG = ON ( Manual Operation To LS Zero ) . 
b. If LS Zero = ON Then Start OPR = ON in Positioning Module QD75M1. 
c. Waiting Servo to Positioning Operation Complete. 


Step 2 : Positoning Start 
a. If Push Button Start = ON Then Positoning Start No.1 = RUN ( To 20mm ) And Waiting Positioning Complete. 
b. If Positioning Complete = ON Then Positoning Start No.2 = RUN ( To 40mm ) And Waiting Positioning Complete.
(source : http://program-plc.blogspot.com)

Alanog input How to it work


In operating and monitoring the PLC system and computer, sometimes people have to deal with analog input. There’re basic differences of the analog input and the digital input and the implementation is quite different from one another. So how does the analog input work, anyway? 

Analog Input: Understanding It
Unlike the digital input, the analog input is using some kind of volume control system. In digital signals, the control is using binary codes of 0 and 1. Since the analog input is using volume controls, the value can range between 0 and full scale mode. These values will be interpreted by the PLC as integer value. The analog signal uses current of voltage mode – depending on which one is used by the system – with proportional magnitude that goes along with the whole processing value signals. For instance, a 0-10V analog input from 4-20mA would be changed into integer 0-32767 value. That’s how the analog input works. 

Analog Input: How to Make it Running
People need to keep the continuous value voltage sampled in order to do the analog input. Once the value is sampled, then it will be converted into numeric values by ADC or Analog to Digital Converter. The sampling process isn’t instant because each sample has to have a starting and stopping time. That’s why it’s called as sampling time because each sample does require certain time to complete. Sampling period is the time between each sample. Sampling period is often bigger than the sample time. Analog input can be used in any industrial use and implementation, but this type of input is usually done and implemented in: 
• Music recording. Music technology is using the integral part of ADC. When music production has been completed on the computers, the ADC is needed to make data stream that will be kept on digital file or compact disc. This type of input is also common when used in TV or radio broadcasting. 
• Signal digital process. When the analog signal has to be converted or processed, and then stored, or transported in the form of digital data, a fast ADC converter is usually used, like the one used in a TV tuner card, where the microcontrollers of 8 bit, 10, 12, and 16 bit are used. But it’s also possible to use fast ADC for certain applications, such as software defining radio application using the oscilloscopes digital storage. That’s the main basic of analog input, signal, and its implementation. 

Communication Setting for PLC Mitsubishi

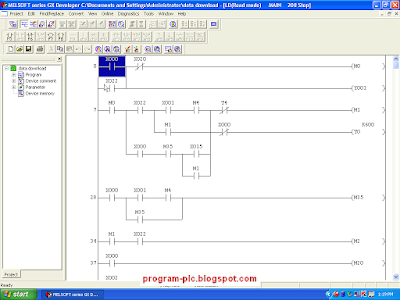
For Communication Setting for PLC Mitsubishi on SoftwarePLC GX Developer, Step by Step :
Step 1
Open Software PLC Mitsubishi GX Developer 
Software PLC Mitsubishi GX Developer
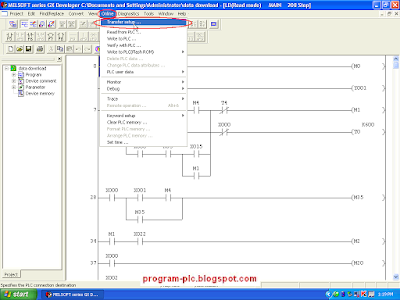
Step 2 
Click Online --> Click Tranfer setup ... 
Online Tranfer setup
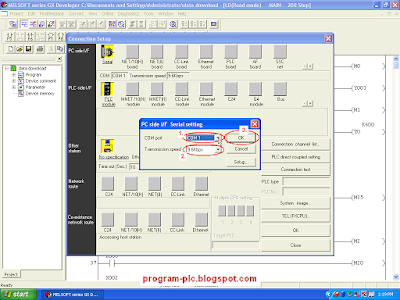
Step 3 
Show Menu Connection Setup 
Click icon Serial 
Show Dialog Box " PC side I/F Serial setting" 
Icon Serial
Step 4 
Show Dialog Box " PC side I/F Serial setting" 
Select COM Port --> Select Transmission speed --> Click OK Button 
PC side I/F Serial setting
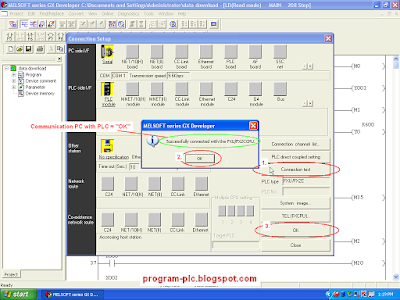
Step 5 
Display Menu Connection Setup 
Click Connection test Button 
If Communication OK Then Show Dialog Box "Successfully connected with the .... ( PLC Type )---> Click OK Button
Display Menu Connection Setup ---> Click OK Button
Successfully connected
 
Support : Creating Website | Johny Template | Mas Template
Copyright © 2011. PLC PROG- REMOTE CONTROL TRAINING - All Rights Reserved
Template Created by Creating Website
Proudly powered by Premium Blogger Template